The Ultimate Guide To Lip Blushing Colours: From Chart Selection To Stunning Results
Ever wondered how to achieve the perfect, natural-looking lip tint that lasts years without daily reapplication? The answer lies in lip blushing colours. This revolutionary semi-permanent makeup technique has taken the beauty world by storm, offering a solution for faded, uneven, or pale lips. But with so many shades and techniques, how do you choose? What does the process really involve? And is it worth the investment? I tried lip blushing myself, and these are my honest thoughts, plus everything you need to know about pros, cons, cost, colour selection, aftercare, and the healing process. Consider this your complete blueprint to a flawless, confident smile.
What Exactly Is Lip Blushing? Demystifying the Procedure
Lip blushing is a form of cosmetic tattooing specifically designed for the lips. It involves depositing pigment into the lips using a specialized tattoo machine. Unlike traditional tattoos, the pigment is placed superficially in the dermal layer, creating a soft, stained effect rather than a harsh line. The resultant tattoo, which normally lasts two to three years, imparts a beautiful, customizable color to the lips, similar to a stain or balm. This treatment serves as a popular alternative to lip flips and lip fillers, focusing purely on color and definition rather than volume.
The technique is an art form. A skilled technician uses a tiny blade or micro-needling device to make microscopic incisions (sentence 32 mentions a blade, though modern machines often use needles) and deposits coloured pigment into your lips and along your lip line to improve the overall look. The goal is to enhance your natural lip shape, correct asymmetry, and provide a constant wash of color that survives workouts, coffee sips, and busy mornings. It’s not about creating a bold, obvious lipstick line; it’s about achieving a "your lips but better" aesthetic.
- Unleash The Urban Spirit 140 City Inspired Dog Names That Tell A Story
- Why Did Daniel Platzman Leave Imagine Dragons The Drummers Shocking Departure Explained
- Patti Stanger Andy Friedman Unraveling The Myth And Celebrating The Legend Of Patti Smith
- Is Brian Curtis Married Unraveling The Privacy Of Nbc 5 Dfws Award Winning Anchor
The Lip Blush Colour Chart: Your Roadmap to the Perfect Shade
This is the most critical step in your lip blushing journey. A comprehensive lip blush tattoo color chart is your best friend. It’s not a one-size-fits-all palette. The ideal shade depends entirely on your skin's undertone and your desired outcome—whether you want a barely-there nude, a rosy blush, or a berry tint.
Understanding Skin Undertones: The Foundation of Colour Choice
Before you even glance at a chart, you must determine your skin's undertone. This is the subtle hue beneath your skin's surface that dictates which colors will harmonize with you. There are three main categories:
- Cool Undertones: Your skin has pink, red, or bluish hints. Veins on your wrist appear blue/purple. Silver jewelry often flatters you more than gold.
- Warm Undertones: Your skin has golden, yellow, or peachy hints. Veins on your wrist appear green. Gold jewelry typically looks best.
- Neutral Undertones: A mix of both cool and warm hints. Both silver and gold jewelry can work. Your veins may appear blue-green.
Expert Tip: If you're unsure, hold a plain white shirt up to your face in natural light. If your skin looks dull or yellowish, you likely have warm undertones. If it looks pink or rosy, you likely have cool undertones.
- Spidey And His Amazing Friends Interview Inside The World Of Marvels Youngest Heroes
- Unlock The Legend Your Ultimate Guide To The Halo Master Chief Collection Key
- The Ultimate Guide To The Best Podcast Camera In 2024 Video Podcasting Done Right
- Gibson Standard Midtown
Navigating the Lip Blush Colour Chart by Undertone
Once you know your undertone, you can strategically select from the lip blushing color chart. Here’s a general guide:
- For Cool Undertones: Look for shades with blue or purple bases. Think berry, mauve, rosy pink, and cool nudes (like a pinky-beige). These colors will prevent your lips from looking washed out or muddy.
- For Warm Undertones: Opt for shades with orange, coral, or golden bases. Peachy nudes, terracotta, warm pinks, and coral-reds will complement your skin beautifully.
- For Neutral Undertones: You have the most flexibility! You can pull off both cool and warm shades. True roses, balanced pinks, and classic reds are often stunning.
The guide to learning to choose perfect lip shades for different skin tones also includes correction options. If you have naturally very dark or ashy lips, a technician might use a color-correcting pigment (like a peach or salmon shade) first to neutralize the darkness before layering your desired color on top. This is crucial for achieving a healed result that matches the color in the chart.
My Personal Experience: Honest Thoughts, Pros, Cons, and Cost
I decided to get lip blushing primarily because my lips have become increasingly pale and colorless, especially after menopause, almost paler than my skin. I wanted a solution that provided constant, subtle definition without the hassle of daily lipstick. After extensive research, I found a reputable artist and booked my session.
The Pros (From My Perspective):
- Time-Saver: No more reaching for lipstick 10 times a day.
- Confidence Boost: Waking up with color and defined borders is incredible.
- Great for Smokers: It can help neutralize darkened, uneven lips and bring back definition without relying on lipstick (sentence 24).
- Customizable: You can adjust the intensity. I went for a soft, blushing pink.
- Long-Lasting: The two to three-year lifespan (sentence 4) means very little maintenance.
The Cons & Realities:
- The Healing Process is Not Pretty: Your lips will go through several stages: initial boldness, flaking/scabbing (like a mild sunburn), and then a significant fade during the first month. They can look very dark, then ashy or patchy. Patience is key.
- It's a Commitment: While semi-permanent, it requires a touch-up session 6-8 weeks after the initial appointment to perfect the color and shape.
- Potential for Regret: As seen in cautionary tales (sentences 12 & 13), a poor color choice or an inexperienced artist can leave you with a shade that's too dark, wrong-toned, or unnatural. One woman reported it made her look like a character from Monsters Inc. This underscores the importance of choosing your artist wisely and communicating clearly using the color chart.
- Initial Discomfort: The procedure involves depositing pigment, so there is pressure and some stinging. Topical numbing cream is used, but it's not a painless process.
- Cost: Lip blushing is an investment.
The Investment: Lip Blushing Cost Breakdown
The cost for full cosmetic lip color or lip blushing typically costs between $400 and $800 for the initial session (sentence 16). This usually includes the consultation, the procedure, and one follow-up/touch-up session. Prices vary significantly by city, artist experience, and studio reputation, with major metro areas trending toward the higher end (sentence 17). My session fell in the middle of that range. Remember, this is not the place to bargain. You are paying for expertise, sterile conditions, high-quality pigments, and artistry. The touch-up session, if needed, may have a separate, smaller fee.
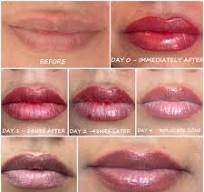
The Healing Process: A Stage-by-Stage Timeline
Understanding the lip blushing healing process is vital for managing expectations. Here’s what to expect:
- Day 1-3: Lips are bright, bold, and swollen (like you've had a lot of lip gloss). They feel tight and tender. This is the "wow, is this permanent?!" stage.
- Day 4-7: The color begins to darken significantly as a thin layer of scab or flaky skin forms. This is normal. Do not pick! Let it flake off naturally.
- Week 2: The flakes are gone, revealing a very faded, often ashy or grayish-looking color. This is the "oh no, did it fail?" stage. This is normal. The true color is still developing under the skin.
- Week 3-4: The color begins to return, slowly and softly. The ashyness diminishes.
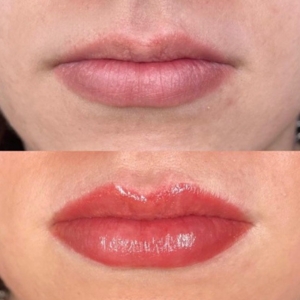
- Week 6-8: This is the "healed results palette" stage. The color has settled into its final, soft, stain-like appearance. This is when you and your artist will assess if a touch-up is needed to add density, adjust shape, or tweak the color.
Aftercare is Non-Negotiable: Follow your artist's instructions meticulously. This typically includes:
- Keeping lips moisturized with a recommended ointment (like a petroleum jelly) for the first week.
- Avoiding direct sun exposure, saunas, and swimming for 2 weeks.
- Not eating spicy, acidic, or salty foods that can irritate.
- Using a gentle, alcohol-free lip balm thereafter.
- Applying SPF to your lips once healed to prevent pigment fading.
Pros and Cons: The Real Talk
Let's summarize the pros and cons in a balanced way.
Pros:
- Saves time and simplifies morning routines.
- Provides 24/7 color and definition.
- Corrects asymmetry and defines the lip border.
- Fades gracefully over years.
- You can still use lipsticks and lip colors after receiving lip blush to change up your look (sentence 5). It acts as a beautiful base.
- Especially beneficial for those with pale, discolored, or uneven lips.
Cons:
- Significant upfront cost.
- A healing process that requires patience and diligence.
- Potential for infection if aftercare is ignored or if the studio is not hygienic.
- Risk of an unsatisfactory color if communication or artist skill fails.
- Not truly "permanent"—requires touch-ups and will fade.
- May not be suitable for those with certain skin conditions, active cold sores, or who are pregnant/nursing.
Success Stories and Cautionary Tales: Learning from Others
The online community is full of lip blushing testimonials. Many share stunning healed results with soft, natural-looking pinks and nudes. One person raved about getting the shade "Blushing," which was almost the same color as their usual MAC lip pencil in Soar, at a fraction of the long-term price (sentence 26). They stated, "I will definitely buy again and try out the other colors!" This highlights the customizability and value once you find your perfect shade.
However, the cautionary tales are equally important. The stories of a woman left with "regrets" on her 'pale pout' (sentence 12) and another who felt she looked like a "character from Monsters Inc" (sentence 13) are powerful reminders. These often stem from:
- Choosing an inexperienced artist.
- Not using the color chart correctly for their undertone.
- Having unrealistic expectations about color intensity.
- The artist not accounting for the skin's natural undertone, causing a muddy or mismatched healed color.
A successful lip tint in the form of lip blushing (sentence 14) is absolutely achievable and is the norm for most who do their research. The key is viewing your initial consultation as a collaborative session where you use the lip blush color guide to select a shade that is uniquely you (sentence 6).
Aftercare Essentials and Product Recommendations
Beyond the basic aftercare, investing in gentle, nourishing products can optimize healing and long-term lip health. While your artist will provide specific ointments, you might later incorporate a hydrating lip oil. One Italian product description (sentences 28-29) perfectly captures the ideal post-healing product: a colored lip oil that's comfortable, intensely nourishing, adapts to pH for a personalized hint of color, and provides a mirrored shine with an instant fresh feeling. This type of product is perfect for maintaining lip health and adding a sheer wash of color over your healed blushing.
Is Lip Blushing Right for You? The Final Verdict
So, is lip blushing something you would try? It’s a deeply personal decision. It’s ideal for:
- Individuals with pale, thinning, or discolored lips.
- Those who want to enhance their natural shape without filler.
- Anyone tired of the daily lipstick routine.
- People seeking a "no-makeup" makeup look.
- Smokers looking to restore lip color and definition.
It’s less ideal for:
- Those who frequently change their lip color preferences.
- Individuals with very dark skin tones (pigment may not show as vibrantly).
- Anyone unwilling to endure the healing process.
- Those with a history of keloid scarring (though rare on lips).
- People seeking a dramatic, opaque lipstick effect (this is a sheer stain).
The story of @makeupbygermany, who received the service after a persistent sunburn on her lips from a Miami trip (sentence 31), shows another practical application: correcting and healing damaged lip skin with pigment.
Conclusion: Your Journey to Perfect Lips Starts with a Chart
Lip blushing colours are not just about picking a pretty pink from a menu. It’s a science of undertones, an art of application, and a commitment to aftercare. The lip blushing color chart is your most powerful tool—use it in consultation with a top artist who understands how shades heal on different skin tones. From the initial consultation to the final healed result, this journey is about enhancing your natural beauty in the most effortless way.
My personal experience? The initial shock of the dark color during healing was nerve-wracking, but seeing the final, soft, blushing hue that matches my natural lip color but better was a revelation. The convenience is unparalleled. Yes, there are cons—the cost, the healing, the risk of a bad outcome. But with meticulous research, the right artist, and realistic expectations, the pros of waking up every day with perfect, defined lips can far outweigh them.
Whether you’re addressing menopause-related paleness (sentence 15), correcting uneven tone, or simply wanting a low-maintenance beauty boost, lip blushing offers a transformative solution. Explore the color chart, understand your undertone, ask for tips from a top artist, and make an informed choice. Your perfect, lasting lip shade is waiting for you in that palette. This is your sign to book a consultation and see what a custom lip blush can do for you.
- Chers Heartbreaking Tribute The Unforgettable Eulogy That Shook A Nation
- Elevate Your Outdoor Entertaining The Ultimate Guide To High Top Table Outdoor Furniture
- Henson Shaving Cream Review The Clinically Proven Secret To Irritation Free Shaving
- The Sleeping Officer Scandal Unpacking Accountability Overtime And Eroding Public Trust
About Lip Blushing - Zapps Electrology and Beauty

Lip Blushing - BJ Grand Salon & Spa, Springfield, Illinois
Lip Blushing: A Guide On Permanent Lip Tattoos - Essential Pairs

